
WordPress out of the box gives authors the ability to add alternative text (“alt text”) to images uploaded to the media library. Seems standard (and it is, that field has probably been around since WordPress 1.0) and helpful.
The intent, obviously, is that one might add alternative text to their images, and that way, when they get served up to the front end via the theme, users who require alternative text can access that.
This is easy for authors to do as they are adding new images. Depending on the theme or block they are using, they may be able to edit the alt attributes directly on the page they are using the image on!
However, when you have thousands of images that are missing alt text, you might be in a world of hurt. The interface for WordPress to enter alt attributes requires one to click on an media item to open its detailed information, type in some alt text, and then close it. Easy for 1, fine for 10, annoying for 50, untenable for 100+.
This is recently an issue we ran into on a project that was less than one week to go live, with about 1200 images with missing alt attributes that we were required to populate. It still takes time to get the alt attributes, but entering them should be as easy as possible.
So, what are your options for bulk uploading alt text? Let’s explore a few.
Option 1: Use AI Plugin
This plugin claims to just do it for you. You can have it scan your media library, and then bulk generate alt text for any attachments that are missing alt text. I did try this out using the free trial and it kind of worked! But it also only added alt text to three images.
- Pros: Set it and forget it. If you trust AI, then go for it.
- Cons: Not free, or even cheap if you have thousands of images. Plus, who knows how good the alt text actually is.
Option 2: Use AI but handroll it
I attempted to utilize Google’s Vision AI to see if I could generate this alt text for cheaper than the plugin. Conceptually, I was willing to just run this locally - so in practice, this was a one-and-done deal.
I already had a CSV export of all the media from WordPress, which included a field for alt text. My idea was to loop over each row in the CSV - sending the image URL to Google Vision for it to analyze, then upading the Alt Text row in the CSV with the suggestions from Google Vision.
I did this with a local Python script, and it worked - in theory. However, the issue is that Google Vision is not for generating alt text, but more like “keywords” of things it recognizes in the image. For example, a good and descriptive alt text for the heading image of this post might be, “A rugged, misty Pacific Northwest coastline with churning blue waves crashing against rocks.” Google Vision simply would return, “Rock, Tree, Wave.” Not great alt text.
In order to turn that into something readable, you’d also have to pass that along to a LLM like ChatGPT that could turn it into an English sentence. Since ChatGPT didn’t have the image, though, it might describe something totally different! I gave up on that approach.
Option 3: Use AI and your brain
Ultimately, we recruited members of the team to each take on generating alt text for a subset of images. Some of these we just had to look at, and others we send to GPT to generate for us. At the end of the day, there wasn’t a quick and easy solution to do this, but what was quick and easy was the script to import them.
What I ended up doing with that CSV was using it to base a bulk import/export function baked into the theme (could easily be a plugin). 250 lines of code gave us a tool that would allow authors to download all the media library items in a CSV, add their alt text to one or more, and upload the updated CSV to replace them in the project.
Step 1: Define a Tools page
This made most sense to me to put this under “Tools” in the WordPress menu.
This utilizes the admin_menu action and the add_submenu_page option to park a new space below the Tools menu in WordPress:
add_action(
  'admin_menu',
  function () {
    add_submenu_page(
      'tools.php', // Parent menu slug
      'Update Media Alt Text', // Page title
      'Update Media Alt Text', // Menu title
      'manage_options', // User Capability - who should see this?
      'update-media-alt-text', // Menu slug
      __NAMESPACE__ . '\render_update_media_alt_text_page' // Callback function
    );
  }
);
That callback function - the last parameter - is the function that gets called when the action fires. This is the function that allows you to construct the page itself.
In my case, I wanted to have a “upload” and “download” area, so the callback function to render the page accounts for those cases.
First, double check that the user is even supposed to be here. If not, kick ‘em out:
if ( ! current_user_can( 'manage_options' ) ) {
  return;
}
Then, I found it easiest to construct the page before dealing with the handlers. In this case, this callback function works as an output buffer - you can close off your PHP tag and just write basic HTML which helps with ensuring markup structure.
<div class="wrap">
  <h1>Update Media Alt Text</h1>
  <p>
    Upload a CSV file to update the alt text for media items in your library.
    The file must include the following columns: <code>ID</code>, <code>Title</code>, <code>_wp_attachment_image_alt</code>, <code>_wp_attached_file</code> and <code>URL</code>.
  <p>Alt text will only be updated if the media ID and file name match and if the current alt text is empty. Ensure your file is correctly formatted before uploading.</p>
  <form method="post" enctype="multipart/form-data">
    <?php wp_nonce_field( 'update_media_alt_text', 'update_alt_nonce' ); ?>
    <label for="csv_file">Upload CSV File:</label>
    <input type="file" id="csv_file" name="csv_file" accept=".csv">
    <button type="submit" class="button button-primary">Upload and Update</button>
  </form>
  <hr/>
  <h2>Export Existing Media</h2>
  <p>Click the button below to download a CSV file containing all media items in your library.<p>
  <p>This file will include columns for <code>ID</code>, <code>Title</code>, <code>_wp_attachment_image_alt</code>, <code>_wp_attached_file</code>, and <code>URL</code>. You can populate the _wp_attachment_image_alt column with the desired alt text and re-upload the file to update media items.
  <form method="post">
    <input type="hidden" name="export_csv" value="1">
    <button id="export-media-csv" class="button">Export Media as CSV</button>
  </form>
</div>
I wanted to enforce the structure of CSV, and the nonce field ensures that the submit is safe and valid when handling it.
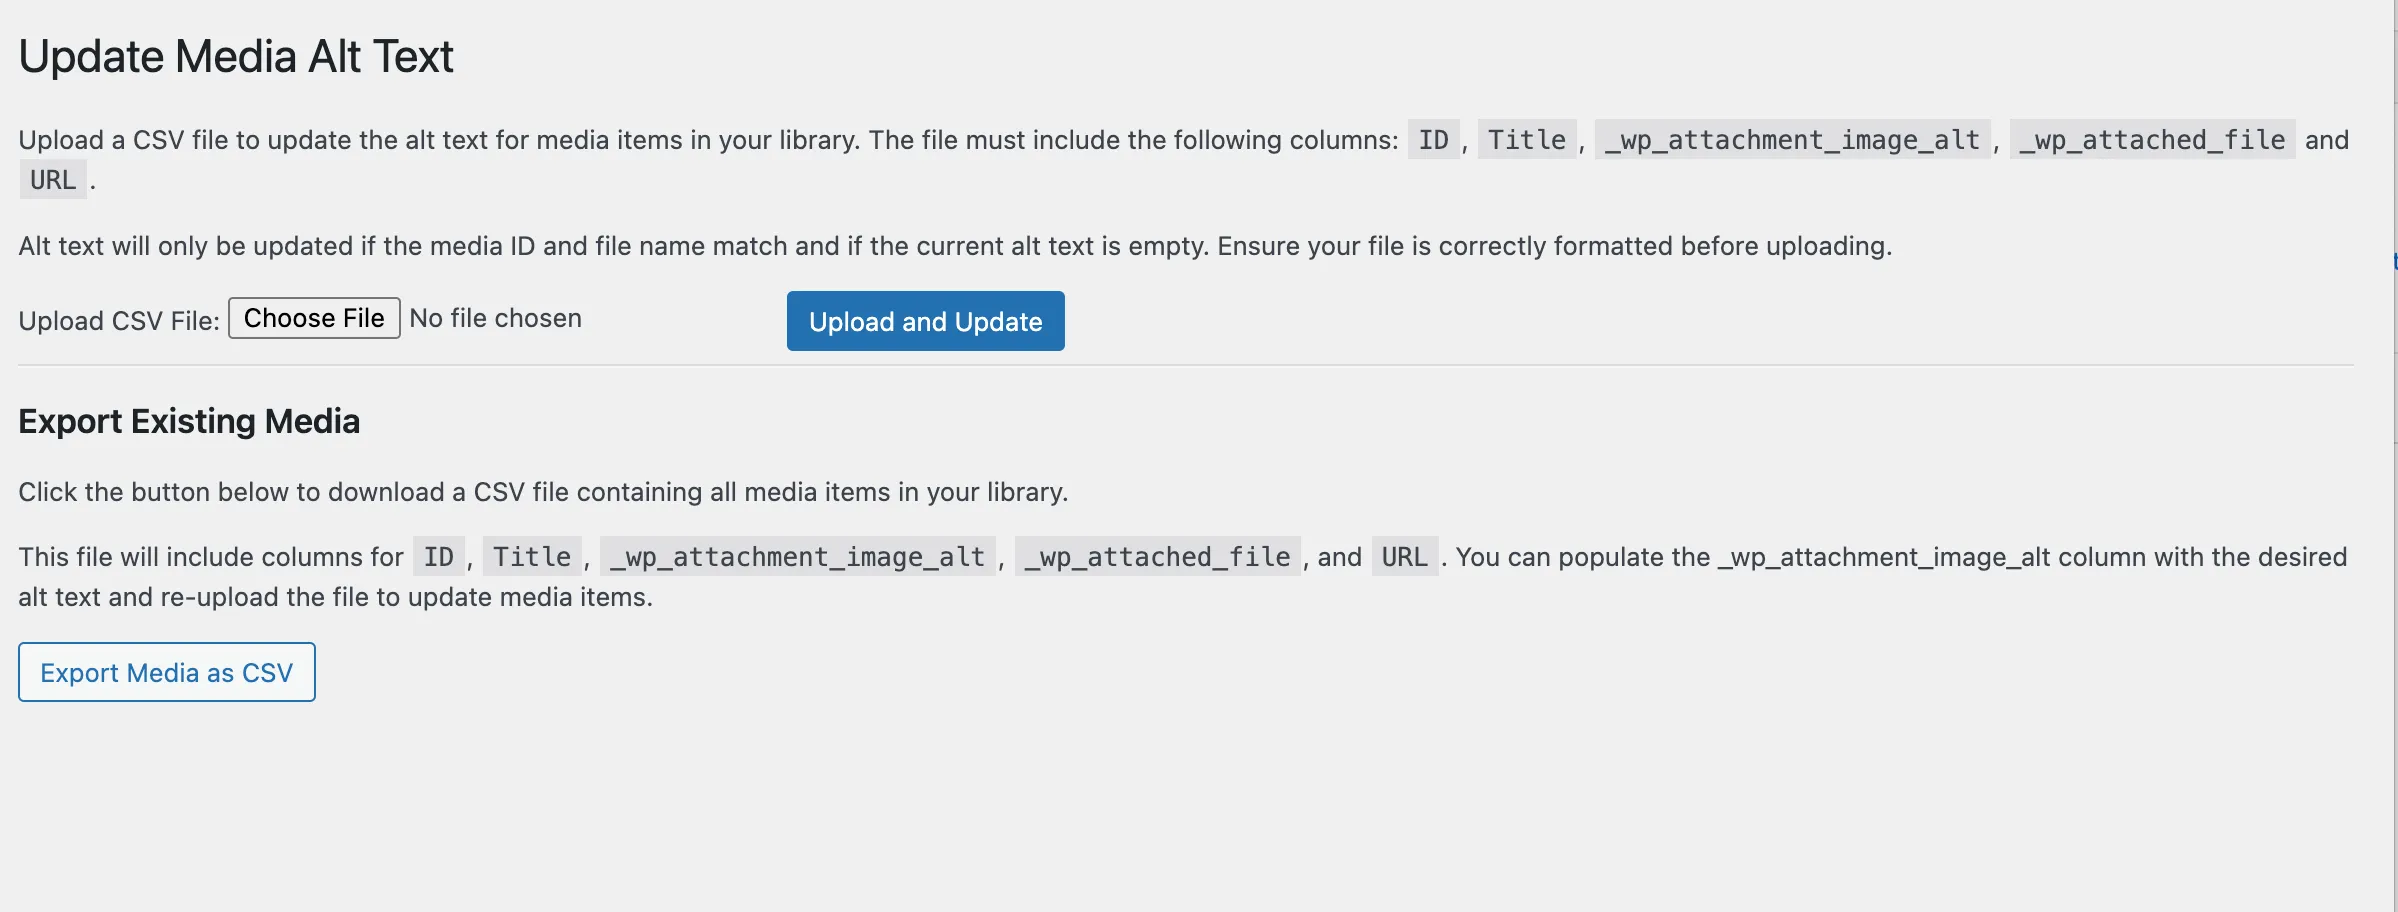
Right now, you’d have a page that looks like this but doesn’t do anything:
What’s left?
- Generating and downloading a CSV of existing media items.
- Processing an Uploaded CSV.
- Hooking up the Tools page to do both
Step 2: Generate / Download CSV of Existing Media Items
The create CSV function was pretty straight forward: Basically, you make a standard WP Query, then loop over the results and generate an output buffer to create the CSV:
// Generate CSV content
$args        = [
  'post_type'      => 'attachment',
  'post_status'    => 'inherit',
  'posts_per_page' => -1,
];
$attachments = get_posts( $args );
Then, you’d loop over that $attachments variable to generate the CSV. First, you’d need to establish an output buffer, and create the CSV headings:
ob_start();
// CSV headings:
echo "ID,Title,_wp_attachment_image_alt,_wp_attached_file,URL\n";

foreach ( $attachments as $attachment ) {
  $id       = $attachment->ID;
  $title    = str_replace( ',', ' ', $attachment->post_title );
  $alt_text = str_replace( ',', ' ', get_post_meta( $id, '_wp_attachment_image_alt', true ) );
  $file     = str_replace( ',', ' ', get_post_meta( $id, '_wp_attached_file', true ) );
  $url      = wp_get_attachment_url( $id );

  echo "{$id},{$title},{$alt_text},{$file},{$url}\n";
}
When loop ends, send the data to the browser - and end the buffer - and it should just download:
// Send the CSV to the browser
header( 'Content-Type: text/csv' );
header( 'Content-Disposition: attachment; filename="media-export.csv"' );
header( 'Content-Length: ' . ob_get_length() );

// Flush output buffer
ob_end_flush();
exit;
Full function here:
function export_media_csv() {
  // Check user permissions
  if ( ! current_user_can( 'manage_options' ) ) {
    wp_die( 'Unauthorized', 403 );
  }

  // Generate CSV content
  $args        = [
    'post_type'      => 'attachment',
    'post_status'    => 'inherit',
    'posts_per_page' => -1,
  ];
  $attachments = get_posts( $args );

  if ( empty( $attachments ) ) {
    wp_die( 'No media items found.', 404 );
  }

  ob_start();
  // CSV headings:
  echo "ID,Title,_wp_attachment_image_alt,_wp_attached_file,URL\n";

  foreach ( $attachments as $attachment ) {
    $id       = $attachment->ID;
    $title    = str_replace( ',', ' ', $attachment->post_title );
    $alt_text = str_replace( ',', ' ', get_post_meta( $id, '_wp_attachment_image_alt', true ) );
    $file     = str_replace( ',', ' ', get_post_meta( $id, '_wp_attached_file', true ) );
    $url      = wp_get_attachment_url( $id );

    echo "{$id},{$title},{$alt_text},{$file},{$url}\n";
  }

  // Send the CSV to the browser
  header( 'Content-Type: text/csv' );
  header( 'Content-Disposition: attachment; filename="media-export.csv"' );
  header( 'Content-Length: ' . ob_get_length() );

  // Flush output buffer
  ob_end_flush();
  exit;
}
Step 3: Function to Process Updated CSV
At that point, the author can edit the CSV and populate alt text however they wish.
To then re-import, we need a function to process the updated CSV. The processing function accepts the CSV in the same format. I wanted to ensure that we did not overwrite any existing ALT text, so the script will look for the attachment ID and only update its alt text IF the alt text is empty. This could be modified if there was a requirement to replace alt text.
First, we’ll use the WP_Filesystem class to read the uploaded file safely.
function process_csv_and_update_alt_text( $file_path ) {
  global $wp_filesystem;
  if ( ! function_exists( 'WP_Filesystem' ) ) {
    require_once ABSPATH . 'wp-admin/includes/file.php';
  }
  WP_Filesystem();

  // Read the file contents
  $file_contents = $wp_filesystem->get_contents( $file_path );
  if ( false === $file_contents ) {
    return []; // If file can't be read, return empty array
  }
Once the file is loaded in the function, let’s tear it apart:
// Split file contents into rows; if rows are empty stop processing
$rows = explode( "\n", $file_contents );
if ( empty( $rows ) ) {
  return [];
}
This will divide CSV file into “rows”, by parsing \n newline characters into an array. That means each array member in the $rows variable represents a single row in the CSV.
To ensure fidelity of the CSV file, I wanted to ensure that the rows had the proper headers. I built a helper function to validate the header rows, called like this. This utilizes PHP’s str_getcsv which parses the string of comma-separated values.
// Extract the header row;  If header is invalid, stop processing
$header = str_getcsv( array_shift( $rows ) );
if ( ! validate_csv_header( $header ) ) {
  return [];
}
Helper Function:
/**
 * Validates the format of the CSV, expecting these headers:
 * 'ID', 'Title', '_wp_attachment_image_alt', '_wp_attached_file', 'URL'
 *
 * @param array $header - the header of the CSV
 * @return bool true if the header matches, false otherwise
 */
function validate_csv_header( $header ) {
  $required_columns = [ 'ID', 'Title', '_wp_attachment_image_alt', '_wp_attached_file', 'URL' ];
  return ! array_diff( $required_columns, $header );
}
Assuming we’ve made it this far, we can proceed to loop over the uploaded CSV. I wanted to track what was changed in order to return feedback to the author when the script was finished, so i did that by adding the successful changes to an empty array.
$updated_items = []; // tracks which items changed

// Process each row while skipping empty rows
foreach ( $rows as $row ) {
  if ( empty( trim( $row ) ) ) {
    continue;
  }

  $data = str_getcsv( $row );
Now we are in the thick of it. First, we verify that the row matches the headers. This prevents malformed or misaligned CSVs from putting the wrong data on the fields:
// Ensure the row has the same number of elements as the header
if ( count( $data ) !== count( $header ) ) {
  continue;
}
Then, gather the heading information and combine it with the row information. This is useful because the heading information happens to be the correct fields for the WordPress database. By using array_combine, we are creating a new array just for this item in the loop, that has name-value parse of header values with data value.
$row_data = array_combine( $header, $data );

// Check if the media item exists:
$attachment_id = intval( $row_data['ID'] );
$new_alt_text  = sanitize_text_field( $row_data['_wp_attachment_image_alt'] );
$attached_file = sanitize_text_field( $row_data['_wp_attached_file'] );

// If it does, skip if alt text is empty
if ( empty( $new_alt_text ) ) {
  continue;
}
I skip the row if the alt text is empty in the uploaded CSV - no need to accidentally erase any existing alt text!
Then, we actually make the change: first, need to grab the existing file to do comparison against:
$current_file = get_post_meta( $attachment_id, '_wp_attached_file', true );
$current_alt  = get_post_meta( $attachment_id, '_wp_attachment_image_alt', true );
I will verify that the attached file from the CSV and the IDs match - AND re-confirm the current alt is empty before applying the change using update_post_meta.
To summarize the change to authors, we update the $updated_items array with a new row, so they can see what was changed upon completion.
// Only update alt text if the ID and file match and the alt text is empty
if ( $attached_file === $current_file && empty( $current_alt ) ) {
  update_post_meta( $attachment_id, '_wp_attachment_image_alt', $new_alt_text );

  $updated_items[] = [
    'ID'        => $attachment_id,
    'Title'     => get_the_title( $attachment_id ),
    'AltText'   => $new_alt_text,
    'MediaLink' => get_edit_post_link( $attachment_id ),
  ];
}
}

return $updated_items;
The full function:
/**
 * Reads the uploaded CSV, and processes each row
 * if the row matches a media item (ID / Name) **and** it has no alt,
 * the script will copy the alt field from the CSV into the media items alt text field.
 *
 * @param string $file_path - path to the uploaded file
 */
function process_csv_and_update_alt_text( $file_path ) {
  global $wp_filesystem;
  if ( ! function_exists( 'WP_Filesystem' ) ) {
    require_once ABSPATH . 'wp-admin/includes/file.php';
  }
  WP_Filesystem();

  // Read the file contents
  $file_contents = $wp_filesystem->get_contents( $file_path );
  if ( false === $file_contents ) {
    return []; // If file can't be read, return empty array
  }

  // Split file contents into rows; if rows are empty stop processing
  $rows = explode( "\n", $file_contents );
  if ( empty( $rows ) ) {
    return [];
  }

  // Extract the header row;  If header is invalid, stop processing
  $header = str_getcsv( array_shift( $rows ) );
  if ( ! validate_csv_header( $header ) ) {
    return [];
  }

  $updated_items = [];

  // Process each row while skipping empty rows
  foreach ( $rows as $row ) {
    if ( empty( trim( $row ) ) ) {
      continue;
    }

    $data = str_getcsv( $row );

    // Ensure the row has the same number of elements as the header
    if ( count( $data ) !== count( $header ) ) {
      continue;
    }

    $row_data = array_combine( $header, $data );

    // Check if the media item exists
    $attachment_id = intval( $row_data['ID'] );
    $new_alt_text  = sanitize_text_field( $row_data['_wp_attachment_image_alt'] );
    $attached_file = sanitize_text_field( $row_data['_wp_attached_file'] );

    // If it does, skip if alt text is empty
    if ( empty( $new_alt_text ) ) {
      continue;
    }

    $current_file = get_post_meta( $attachment_id, '_wp_attached_file', true );
    $current_alt  = get_post_meta( $attachment_id, '_wp_attachment_image_alt', true );

    // Only update alt text if the ID and file match and the alt text is empty
    if ( $attached_file === $current_file && empty( $current_alt ) ) {
      update_post_meta( $attachment_id, '_wp_attachment_image_alt', $new_alt_text );

      $updated_items[] = [
        'ID'        => $attachment_id,
        'Title'     => get_the_title( $attachment_id ),
        'AltText'   => $new_alt_text,
        'MediaLink' => get_edit_post_link( $attachment_id ),
      ];
    }
  }

  return $updated_items;
}
Step 4: Run Functions from Tools Page
At this point, I have two disconnected functions and a page to run them on. I need to update my rendering callback funtion to handle the events when someone either clicks the “export” button, or uploads a file.
Downloading
You’ll note that there are two forms on my Tools page - one to upload, one to download. Let’s start with the easier one but maybe the sketchier one.
The download form consists of a hidden input and a button. In this case, we’ll use the hidden input’s value to call the function, but I need an JS handler to handle the submit. This also could easily be done server side by actually submitting the form, but I’ll do that for the upload process.
The idea here is to create a hidden link that downloads the generated CSV so it is seamless to authors.
First, need an event listener to handle the button click:
document.addEventListener('DOMContentLoaded', () => {
const exportButton = document.querySelector('#export-media-csv');

if (exportButton) {
  exportButton.addEventListener('click', (e) => {
    e.preventDefault();
I “prevent default” to avoid actually posting the form.
Then, we will use AJAX to actually call the function that generates the CSV. Remember that this function returns the generated CSV file itself - but we can’t directly download that unless we simluate a user clicking a link to it.
So, we can generate a fake button, “click” it with JS, and viola - it will download the file. It works and I can definitely see how this could be used for nefarious purposes on less than scrupulous websites.
    const url = `${ajaxurl}?action=export_media_csv`;
    // if URL is returned, generate a hidden button that JS clicks to download the CSV
    if (url) {
      const link = document.createElement('a');
      link.href = url;
      link.style.display = 'none';
      document.body.appendChild(link);
      link.click();
      document.body.removeChild(link);
    } else {
      console.error('CSV not generated');
    }
  });
}
});
Full JS Handler:
document.addEventListener('DOMContentLoaded', () => {
const exportButton = document.querySelector('#export-media-csv');

if (exportButton) {
  exportButton.addEventListener('click', (e) => {
    e.preventDefault();

    const url = `${ajaxurl}?action=export_media_csv`;
    // if URL is returned, generate a hidden button that JS clicks to download the CSV
    if (url) {
      const link = document.createElement('a');
      link.href = url;
      link.style.display = 'none';
      document.body.appendChild(link);
      link.click();
      document.body.removeChild(link);
    } else {
      console.error('CSV not generated');
    }
  });
  }
});
Uploading
OK - let’s finish this up. You’ve downloaded your CSV, you’ve added alt text to each row - let’s upload it and be done.
The Upload form will post to itself, so we will handle the server requests within the Tools page. First, only fire if the $_POST method is fired, and second, only proceed if the nonce matches, for security:
if ( 'POST' === $_SERVER['REQUEST_METHOD'] ) {

  if ( ! isset( $_POST['update_alt_nonce'] ) || ! wp_verify_nonce( $_POST['update_alt_nonce'], 'update_media_alt_text' ) ) {
    wp_die( 'Unauthorized request' );
  }
Then, we parse the file itself to ensure it is correct. Are there errors with it? Does it exist? And can we actually process it with our process function?
if ( isset( $_FILES['csv_file']['error'] ) && UPLOAD_ERR_OK === $_FILES['csv_file']['error'] ) {
  if ( isset( $_FILES['csv_file']['tmp_name'] ) ) {
    $file_path     = $_FILES['csv_file']['tmp_name'];
    $updated_items = process_csv_and_update_alt_text( $file_path );
  } else {
    echo '<div class="notice notice-warning"><p>No file was found / uploaded.</p></div>';
    return;
  }
Assuming so, we can then display the results to the author in a helpful table.
if ( ! empty( $updated_items ) ) {
  echo '<div class="notice notice-success"><p>The following media items were updated:</p>';
  echo '<table class="widefat fixed">
                  <thead>
                      <tr>
                          <th>ID</th>
                          <th>Title</th>
                          <th>New Alt Text</th>
                          <th>Media Link</th>
                      </tr>
                  </thead>
                  <tbody>';
  foreach ( $updated_items as $item ) {
    echo '<tr>
                      <td>' . esc_html( $item['ID'] ) . '</td>
                      <td>' . esc_html( $item['Title'] ) . '</td>
                      <td>' . esc_html( $item['AltText'] ) . '</td>
                      <td><a href="' . esc_url( $item['MediaLink'] ) . '" target="_blank">View Media</a></td>
                    </tr>';
  }
  echo '</tbody></table></div>';
} else {
  echo '<div class="notice notice-warning"><p>No media items were updated.</p></div>';
}
} else {
echo '<div class="notice notice-error"><p>There was an error uploading the file.</p></div>';
}
}
This renders like this on the front end:

All in all, the hardest part now is still writing the alt text. But at least it can be done in a less tedious way than editing each media item individually.
Finally, we ran into some issues with how we were utilizing a custom image block to actually read this alt text, but that was fixed too. That’ll be a post for another time.
In the meantime, if you need this script, have at it: